
Regular technicals
Support
By: Grant Laidlaw
Welcome to the Solutions page
Many people ask for assistance in the understanding of theoretical and practical aspects of the industry. I will endeavour to enlighten. We are going back to basics as I have questions coming in that indicate that the basic understanding necessary to work in industry is not in place.
Jaco asks: On a technical level what is the preferred process to using solder to join wires and in some cases circuit boards. We see that soldering stations have the facility to adjust temperature. The question is how do I determine the correct temperatures for soldering? Thanks.
Wire soldering is a process used to join two or more wires or a wire to a connector or terminal. This involves melting solder around the connection point.
Soldering wire (solder) is a fusible metal alloy used to create permanent, conductive bonds between electrical components or metal workpieces, typically using a rosin flux core for easier bonding. Common types include 60/40 tin-lead and lead-free options, available in various diameters and in lead and lead free options.
Lead-Based (60/40 or 63/37): Melts at lower temperatures, ideal for electronics, with excellent flow.
Lead-Free (RoHS compliant): Stronger joints and environmentally safer, but requires higher temperatures.
Note: Acid core solder wire should not be used for the joining of copper wires or any electronic work.
Equipment For Wire Soldering
- Soldering Iron with stand or soldering station: A basic 40 – 70 watt iron is sufficient for most tasks.
- Rosin Flux paste helps improve the soldering process, however rosin-core solder usually contains a sufficient amount of
- Wire Cutters/Strippers: For preparing the wires.
- Sponge or Brass Sponge with Water: To clean the soldering iron tip.
- Heat Gun and Heat Shrink Tubing: To insulate and protect soldering joints.
- Alligator Clips: To elevate wires on a surface.
- Safety Glasses: To protect your eyes from any splatter.
- Fume extractor or an area is ventilated
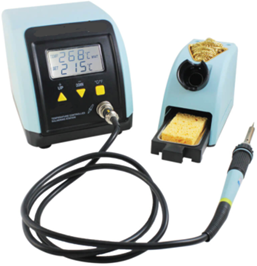
Typical soldering station
Basic Soldering Process
- Prepare the workspace
- Ensure good ventilation.
- Heat up your soldering iron in the stand to the required temperature
- Clean the tip with a sponge or brass sponge.
- Strip the wires
- Use wire strippers to remove a small section of insulation from the ends of the wires you plan to solder. Typically, 12mm is what you should aim for. Make sure you do not strip more or less than that, as it will hinder the process.
- Apply the correct size heat-shrink tubing over one side of the wires to be joined if applicable.
- The heat-shrink tubing should be long enough to fully cover the joint and an additional 2 cm on each end.
- Tin the soldering iron tip
- Apply a small amount of solder to the iron’s tip. This is called ‘tinning’ and helps improve heat transfer.
- Apply flux (if necessary)
- If your solder doesn’t have a flux core, apply a small amount of a rosin flux to the stripped ends of the wires. Even with the flux core, adding flux can be beneficial.
- Prepare the joint
- Spread wire strands and push the wires toward each other, interlocking the strands. Loosely twist the meshed wires. Make sure the connection is mechanically secure.
- Elevate the wires off the work surface and apply flux if needed – Flux cleans the joint, reduces oxidation and makes the solder connection stronger.
- Solder the joint
- Touch the soldering iron to the joint at an angle that maximises the surface contact to heat it. Apply the solder directly to the wire, not the iron. The solder should flow smoothly around the joint and the heat will draw the solder into the meshed strands.
- Remove the iron and allow the solder to cool naturally.
- Inspect the joint
- A good solder joint should be shiny and smooth.
- Ensure there’s no excess solder that could cause short circuits.
- Shrink the tubing
- After soldering the joints, slip the heat shrinking tubing and use the heat gun to finish the process.
- Clean and maintain your iron
- Clean the tip after use and re-tin it before turning off the iron.
How to Solder Wires to Connectors
- Prepare the wire ends by stripping and tinning.
- Insert the tinned wire into the connector terminal.
- Apply heat and apply solder to the point where the wire meets the connector.
For soldering wires, a general-purpose soldering iron temperature should be as below. Use lower temperatures for smaller, delicate wires and higher temperatures for thicker, higher-mass wires that absorb more heat. As a rule, aim to complete the joint within 2 seconds.
In general when using soldering stations one can adjust the temperature, a general recommendation is as follows:
- Lead-based Solder 60/40 or 63/37 Set iron to 280°C – 300°C
- Lead-Free Solder (SAC305): Set iron to 315°C – 330°C
Soldering electronics
In electronics soldering temperature is a critical parameter. The temperature at which this soldering occurs must be carefully controlled: too low, and the solder may not fully melt or bond, leading to weak cold solder joints, too high and components, printed circuit boards, or the solder itself can be damaged (burned pads, charred flux, brittle joints, etc.). Engineers and technicians often ask what the correct soldering temperature is, but the answer depends on many factors – the solder alloy composition, the soldering method and the thermal mass of the assembly, and the sensitivity of components.
Achieving the right soldering temperature is crucial for strong, reliable solder joints.
- Soldering temperature directly affects joint quality and reliability. Using too low a temperature can lead to weak “cold” solder joints, while too high a temperature risks damaging components or the PCB. Optimal temperature ensures proper wetting and a solid metallurgical bond.
- Different solder alloys and processes require different temperature settings. Lead-based solder melts at 183°C, whereas common lead-free alloys melt around 217°C. Lead-free soldering typically needs 30 – 50°C higher temperature.
- Proper soldering temperature balances fast wetting with minimal thermal stress. The soldering iron must be hot enough to melt solder quickly and flow it into joints, but not so hot that flux burns off or components overheat.
- Excessively high soldering temperatures causes flux degradation and oxid Most fluxes break down above ~350 °C, charring and losing effectiveness. Higher heat also accelerates solder oxidisation, which can prevent proper bonding.
- Standards and best practices guide engineers on soldering temperatures. Industry guidelines, standards and manufacturer data sheets provide temperature recommendations for various solders and processes.
Understanding Soldering Temperature and Melting Point
Soldering temperature is the temperature at the joint when forming a solder bond. A common misconception is that one should set a soldering iron at the solder’s melting point. In reality, effective soldering requires the joint area to be heated above the alloy’s melting point (liquidus). For example, a typical leaded solder (63% tin, 37% lead eutectic) melts at 183 °C, yet soldering irons are usually set much higher – often around 300–350 °C – to perform good hand soldering.
Similarly, lead-free solders melt around 217 °C, but irons are set tens of degrees higher for successful soldering. There are several important reasons for this:
Thermal Transfer and Heat Capacity
When the soldering iron tip touches a joint, it must not only melt the solder but also heat the copper pad and component lead. These act as heat sinks at room temperature. If the iron were exactly at 183 °C, the moment it contacts the cooler workpiece, heat would flow out and the solder could solidify. Thus, the iron needs to be significantly hotter than the solder’s melting point so that it can deliver enough heat into the joint quickly without the temperature dropping below liquidus.
Being well above the melting point ensures a reserve of thermal energy, so the joint area reaches solder liquidus rapidly and stays molten long enough to form a quality bond.
Flux Activation and Effectiveness:
Solder flux is essential for removing oxides and allowing solder to bond to metal surfaces. Fluxes are formulated to activate within certain temperature ranges. If your soldering temperature is too low, the flux may not fully activate to clean the surfaces, or it may not evaporate solvents properly. Conversely, if the temperature is too high the flux can burn.
Oxidation of Solder and Tip
Hot metals oxidise when exposed to air. The higher the temperature, the faster oxidation occurs. When solder is molten, oxide forms on its surface (the dull film you might see if solder stays liquid too long). Flux combats this by continually cleaning and scavenging oxides. The flux itself gets consumed in the process.
Additionally, the soldering iron tip itself will oxidise faster at elevated temperatures, which is why irons left idling at 400 °C will have blackened, non-wettable tips. From a maintenance perspective, lower tip temperatures extend tip life.
Factors influencing optimal soldering temperature:
Several factors influence what temperature (and time) will yield the best results.
Solder Alloy Composition
Different solder alloys have different melting points, the general rule is to set the soldering tool about +50–150 °C above the alloy’s melting point, depending on circumstances.
A guideline for hand soldering is “melting point + 100 °C” as an iron tip temperature. In practice, this means roughly 315–330 °C for lead-free and a bit lower around 280–300 °C for tin-lead solder.
Time and Technique
Temperature cannot be considered in isolation from time. A higher temperature allows a shorter contact time to achieve a good joint, whereas a lower temperature might require holding the iron on the joint longer.
For manual soldering with a soldering iron, a good rule of thumb is: set the iron to the lowest temperature that still allows you to form a proper joint in a couple of seconds.
In summary, for hand soldering, start around 315 °C (leaded) or 330 °C (lead-free) and adjust as needed. Use the lowest temperature that still allows soldering quickly. Many professionals rarely go above 350 °C unless warranted.
Consequences of Improper Soldering Temperature
Working with solder requires precision, especially regarding temperature. Deviations from the optimal range, whether too low or too high, compromise electronic assembly reliability.
Too Low Temperature / Insufficient Heat
Insufficient heat prevents solder from reaching its proper melting point, leading to poor wetting and weak joints. The most common outcome is a cold solder joint, characterised by a dull, lumpy, or grainy appearance. This occurs when solder doesn’t fully melt or flow, often due to an inadequately hot iron or premature heat removal.
Low temperatures also hinder flux activation, preventing effective cleaning of oxides and proper solder bonding. Solder may ball up and fail to adhere. In through-hole applications, insufficient heat can prevent solder from filling the hole completely.
Too High Temperature / Excessive Heat
Excessive heat, whether from an iron or reflow process, can cause irreversible damage to components, PCBs, and degrade solder joint quality.
- Component damage
- Burnt flux and solder joint integrity
- Solder bridges and splatter: Overly hot and liquid solder is prone to forming unwanted bridges or splattering.
- Shortened Equipment Life: Consistently running soldering equipment at maximum temperatures shortens the lifespan tips (due to rapid oxidation) and heater elements.
Select the Right Tip and Tool
Match tip size to the joint; larger tips (more thermal mass) at moderate temperatures are better for large joints. Avoid compensating for small tips by increasing the heat. For fine work, use specialised tips that concentrate heat efficiently.
Jaco I hope that this assists you with your work and your understanding of soldering and soldering temperatures.
Grant Laidlaw
grant@acra.co.za
REFERENCES:
ACRA
SAFETY STANDARD EN378-1:2017-03
IPC-7352 : 2023